Human tracheal intubation model training model
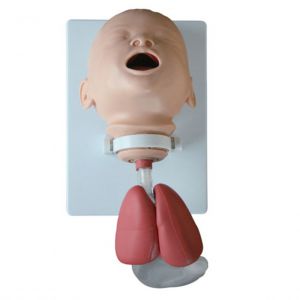
The model is designed and produced on the basis of normal human anatomy from the shape to the main parts. The upper chest wall and head bones are made of fiberglass, and the face, nose, mouth, tongue, epiglottis, glottis, trachea, bronchi, esophagus, lung, stomach, and upper chest are made of soft and elastic rubber plastic. ; Equipped with a movable jaw that can open and close the mouth; the movement of the neck joint can make the head tilt back up to 80 degrees. Lean forward up to 15 degrees. There are light signals indicating the intubation site. Th...
The model is designed and produced on the basis of normal human anatomy from the shape to the main parts. The upper chest wall and head bones are made of fiberglass, and the face, nose, mouth, tongue, epiglottis, glottis, trachea, bronchi, esophagus, lung, stomach, and upper chest are made of soft and elastic rubber plastic. ; Equipped with a movable jaw that can open and close the mouth; the movement of the neck joint can make the head tilt back up to 80 degrees. Lean forward up to 15 degrees. There are light signals indicating the intubation site. The operator can perform intubation training according to the routine steps of endotracheal intubation.
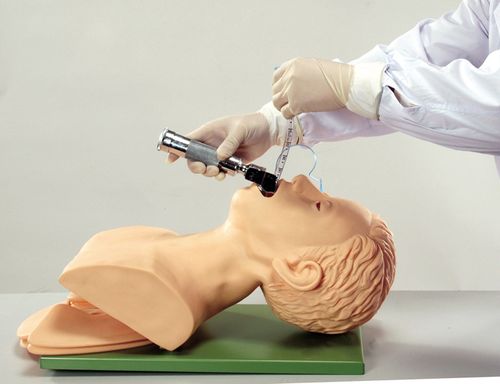
Oral endotracheal intubation method:
1. Preparation before intubation: A: Check that the laryngoscope blade and the mirror handle have been properly clamped, and the headlight of the mirror is on. B: Check the catheter cuff and use a syringe to inflate the cuff at the front end of the catheter to make sure that the cuff is not exposed. , then evacuated the cuff. C: Use a soft cloth dipped in lubricating oil to smear the catheter tip and the surface of the cuff, and use a brush dipped in lubricating oil to smear the inside of the trachea to facilitate the sliding of the catheter.
2. Lie the dummy on its back, tilt its head back and raise its neck, so that the mouth, pharynx and trachea basically overlap on one axis.
3. The operator stands on the side of the dummy's head and holds the laryngoscope in the left hand, so that the illuminated laryngoscope is inclined to the larynx at a right angle, and the laryngoscope is inserted along the back of the tongue to the base of the tongue. The anterior segment is placed at the junction of the epiglottis and the base of the tongue, and then the laryngoscope is lifted up to see the glottis.
4. After exposing the glottis, hold the catheter with the right hand, align the front part of the catheter with the glottis, and gently insert the catheter into the trachea, about 1cm into the glottis, and then continue to rotate deeply into the trachea, about 4cm for adults and 2cm for children. Generally, the length of adult full-time custody is 22-24CM (it can be customized according to the patient's situation).
5. Insert a dental tray next to the tracheal tube, and then withdraw the laryngoscope.
6. Connect the resuscitator to the catheter, squeeze the resuscitation balloon to blow air into the catheter.
7. If the catheter is inserted into the trachea, inflation will cause the lungs to expand. If the catheter is mistakenly inserted into the esophagus, the inflation will cause the stomach to expand and a buzzer will sound.
8. After confirming that the catheter has been accurately inserted into the trachea, use a long tape to properly fix the catheter and dental tray.
9. Use a syringe to inject an appropriate amount of air into the cuff. Inflation of the cuff can seal the catheter and the tracheal wall, so as to prevent the mechanical respirator from leaking air when it is pumped into the lungs, and to prevent vomit and secretions from flowing back into the trachea.
10. Evacuate the cuff with a syringe and pull out the trustee.
11. If the laryngoscope is improperly used and the teeth are compressed, there will be an alarm sound.
Marketing Center
Hong Kong, ChinaProduction Base
Shanghai, ChinaProducts
Contact Us
 Address: Hong Kong, China
 Phone:+86 13383897707
 Email:sophia@adahealthy.com
 Mobile:+86-0379-65160607
举报邮箱:sophia@adahealthy.com
举报电话:+86 19937901373
Social Media